

Blog
Customized Map CMS Plugin
There are usually a lot of repetitive needs, when it comes to creating a website.
Take the following picture for example, functions such like display both the information and map of locations at the same time will be a need for multiple pages or websites.
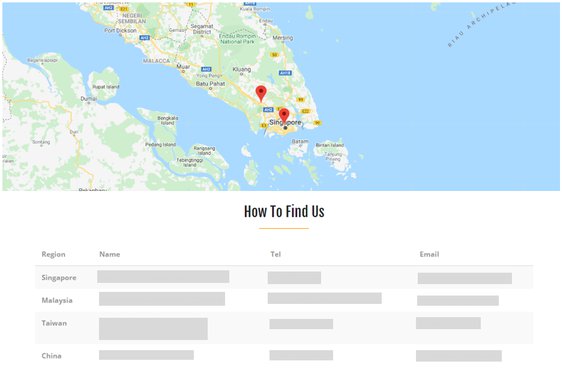
Every section of map, information table of locations, and the js for control and dynamic interaction would need to be edit repeatedly.
Also, you'll have to do works like: marking locations in the table to maps, clicking on a specific location in the table, and dynamically focusing on that specific location, over and over again.
Just extract the repetitive parts and make them into a plugin will make it easier to manage websites in such case.
Customized cms plugin meets all the repetitive needs for websites
Imagine being able to have location tables and maps showing location markers depend on the table.
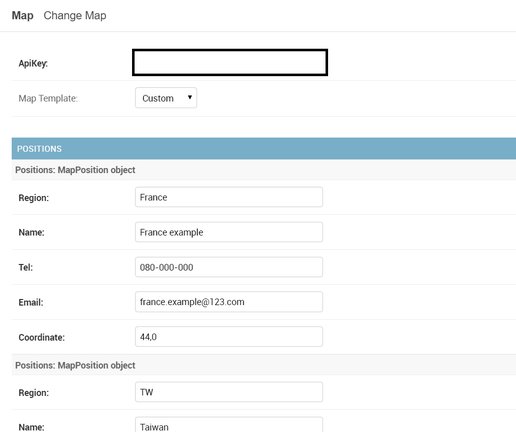
All you need is to add plugin to the target placeholder and provide the GMap API key, information for one or more location columns, and HTML rendering the content for it.
Once identify all your needs, we could set the input of plugin to be gmap api key, template being rendered, and multiple locations.
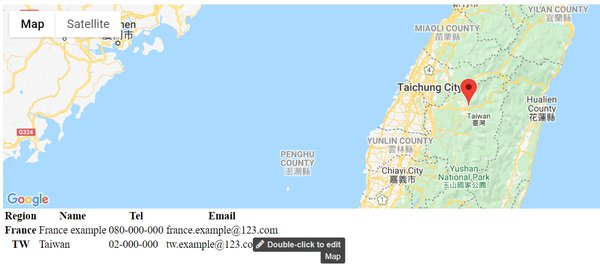
Let's take a look at the example on the official website first.
In cms_plugins.py, we use HelloPlugin to extend from CMSPluginBase and decorator to register the Plugin.
Also, we add model to the already built class in models.py so that we could add the HELLO object to the Placeholder. The result after rendering will be shown on pages depends the content of render_template.
Once having some basic concepts, you could start to create your own plugin.
Quickly create a project, if you don't have one on hand.
Here we take an empty cms project for example.
Create a cms plugin, that is, extract a specific function and make it into an app.
We create two models: GmapTable and GmapPosition for our need.
GmapTable to record every apiKey of maps and selected templates, while GmapPosition to record locations related to GmapTable ( e.g., to show multiple locations on a map will make multiple locations be related to one map, that is, a many-to-one relationship )
from django.db import models

from django.utils.translation import ugettext_lazy as _

from cms.models import CMSPlugin

# This might need to be adjusted to fit in any project
from gmap_table import settings

# Create your models here.

class GmapTable(CMSPlugin):
    apiKey = models.CharField(max_length=100)
    renderTemplate = models.CharField(
        _('GMap Table Template'), max_length=150, blank=True,
        choices=settings.GMAP_TABLE_TEMPLATES,
        default=settings.GMAP_TABLE_DEFAULT_TEMPLATE,
    )

    class Meta:
        verbose_name = _("GMap Table")
        verbose_name_plural = _("GMap Table")

class GmapPostion(models.Model):
    gmap = models.ForeignKey(GmapTable, related_name="positions")
    region = models.CharField(max_length=60)
    name = models.CharField(max_length=200)
    tel = models.CharField(max_length=60)
    email = models.CharField(max_length=60)
    coordinate = models.CharField(max_length=100)

    class Meta:
        verbose_name_plural = _('Positions')
        verbose_name = _('Positions')
You might have noticed that I used settings (a class I've built) imported from gmap_table for every template.
Let's see what else I've made for template in __init__.py.
from django.conf import settings as _settings
from django.utils.translation import ugettext_lazy as _

class Settings(object):

    GMAP_TABLE_DEFAULT_TEMPLATE = \
        "gamp_table/Default.html"

    GMAP_TABLE_TEMPLATES = [
        (GMAP_TABLE_DEFAULT_TEMPLATE, _("Default")),
    ]

    if hasattr(_settings, 'GMAP_TABLE_TEMPLATES'):
        for ele in _settings.GMAP_TABLE_TEMPLATES:
            if not ele[0] == "gmap_table/Default.html":
                GMAP_TABLE_TEMPLATES.append(ele)

settings = Settings()
GMAP_TABLE_DEFAULT_TEMPLATE is the default option for template, but how to get other options?
We could add plenty of customized templates into our project, and in order to make those html files an option of GMAP_TABLE_TEMPLATES, we need to import the settings of the project.
If the project has a GMAP_TABLE_TEMPLATES variable, we need to add those html files we've set up into the list of GMAP_TABLE_TEMPLATES, which the option of the plugin's template depends on.
Creating a special class settings for gmap_table to control templates list, allows different apps to have the same convenience from the plugin, and all you need is to set the GMAP_TABLE_TEMPLATES variable in the Settings.py of the project.
Like the following setting:
GMAP_TABLE_TEMPLATES = [
    ('CustomMap.html', 'Custom'),
 ]
Then, create a new cms_plugins.py file under the gmap_table folder.
import requests
import json
import re

from cms.plugin_base import CMSPluginBase
from cms.plugin_pool import plugin_pool
from django.contrib import admin
from django.utils.translation import ugettext as _
from django.conf import settings
from django.utils.safestring import mark_safe
from django.template.loader import select_template

from gmap_table import settings as gmapTableSettings
from gmap_table.models import GmapTable, GmapPostion
from boto.ec2 import instance

class Spot(object):
    def __init__(self, region, name, tel, email, coordinate):
        self.region = region
        self.name = name
        self.tel = tel
        self.email = email
        self.coordinate = coordinate

class PositionInline(admin.StackedInline):
    model = GmapPostion
    # form = FormFieldInlineForm
    extra = 1

    def get_positions(self, request, obj=None):
        fields = (
            ('region', 'name', 'tel', 'email', 'coordinate')
        )

        fieldsets = (
            (None, {
                'fields': fields
            }),
        )
        return fieldsets


class GmapTablePlugin(CMSPluginBase):
    model = GmapTable
    module = _("GMap Table")
    name = _("GMap Table")
    inlines = (PositionInline, )
    render_template = gmapTableSettings.GMAP_TABLE_DEFAULT_TEMPLATE

    def get_render_template(self, context, instance, placeholder):
        return select_template([
            instance.renderTemplate,
            gmapTableSettings.GMAP_TABLE_DEFAULT_TEMPLATE,
        ])

    def render(self, context, instance, placeholder):

        spotList = []
        for position in instance.positions.all():
            spot = Spot(
                position.region,
                position.name,
                position.tel,
                position.email,
                position.coordinate,
            )

            spotList.append(spot)
        context.update({
            'spotList': spotList,
            'apiKey': instance.apiKey,
            'gmapId': instance.pk
        })

        return context


plugin_pool.register_plugin(GmapTablePlugin)
Register GmapTablePlugin.
Since one plugin might have multiple positions, create PositionInline additionally
to embed inside GmapTablePlugin.
Also, update the context in GmapTablePlugin to render the information you edited.
Then, set the html file for rendering information.
Add Default.html in templates/gmap_table/, and fill it with the following code:
<script src="https://ajax.googleapis.com/ajax/libs/jquery/3.1.1/jquery.min.js"></script>

<div style="width:100%; height:50%;" align="center">
    <div id="GMap"></div>
</div>
<div id="mapPositions">
    <table class="table table-striped">
        <thead>
            <tr>
                <th scope="col">Region</th>
                <th scope="col">Name</th>
                <th scope="col">Tel</th>
                <th scope="col">Email</th>
                <th class="positionTitle" scope="col">Coordinate</th>
            </tr>
        </thead>
        <tbody>
            {% for spot in spotList %}
            <tr class="spot">
                <th scope="row">{{ spot.region }}</th>
                <td>{{ spot.name }}</td>
                <td>{{ spot.tel }}</td>
                <td>{{ spot.email }}</td>
                <td class="position">{{ spot.coordinate }}</td>
            </tr>
            {% endfor %}
        </tbody>
    </table>
</div>
<style>
    #GMap {
        height: 100%;
    }
</style>
<script>
    $(".position").hide();
    $(".positionTitle").hide();

    var map;

    function initMap() {
      var position = $(".position:first").text().split(",");
      map = new google.maps.Map(document.getElementById("GMap"), {

        center: {lat: parseFloat(position[0]), lng: parseFloat(position[1])}, // 25.031966, 121.563408
        zoom: 8
      });

      $(".position").each(function(){
         var position = $(this).text().split(",");
         if (position.length == 2){ //有 x 與 y
            var x = parseFloat(position[0].trim());
            var y = parseFloat(position[1].trim());

            addMarker(x, y);


         };
      });
    };
    $(".spot").each(function(){
        $(this).on("click", function(){
            var location = $(this).find(".position").text().split(",");
            var position = {lat: parseFloat(location[0]), lng: parseFloat(location[1])}
            map.setCenter(position);
        })
    });
    function addMarker(x, y) {
      marker = new google.maps.Marker({
        position: {
          lat: x,
          lng: y
        },
        map: map
      });
    }

</script>
<script src="https://maps.googleapis.com/maps/api/js?key={{ apiKey }}&callback=initMap&language=en" async defer></script>
And run:
python manage.py makemigrations
python manage.py migrate
python manage.py runserver
Now you can go and check your website!
See all the code here.
Click here to download a PDF copy of this article
Save it to read later, or share with a colleague
Comment
There is no comment, you can make the first one!