Blog
Create CMS-Blog From Scratch
1. Install Django CMS
First, use terminal to create a virtual environment:
conda create -n DjangoCMS python = 3.7
("DjangoCMS" can be named by yourself, Python environment uses python3.7)
Enter the virtual environment:
conda activate DjangoCMS
2. Download djangocms-installer, and create a new folder, and enter it
pip install djangocms-installer
mkdir tutorial-project
cd tutorial-project
3. Create a new project named mysite
djangocms mysite
4. runserver
python manage.py runserver
Then, enter "http: // localhost: 8000 /" in your browser, this should be the login page, account: admin, password: admin. After you login the page , you can see the screen just like the picture below. It means that the installation is successful.

Some places on the Internet provide ready-made templates. For instance, you can go to "w3layout" to download your favorite template.
Choosing your favorite template, click "download template" . After downloading, open the downloaded folder, where index.html is the main storage place of html, and other files such as "css, fonts, and images" store the layout, font, and image files of the web page.
First, put the html file (index.html here) into the CMS project that you just created, the location is: / your project name / templates (example here: / mysite / templates) and rename " index.html " to " base.html ".
Next, put other files (css, fonts, images) into the created CMS project, the location is: / your project name / static (here is / mysite / static)
Next we need to edit the html code:
First of all, at the beginning of the file, we need to load related tags.
{% load cms_tags menu_tags seikizai_tags staticfiles%}
Then add the following code to the end of head and the beginning of body and the upper end of body .
<html>
<head>
{% render_block “css”%}
</ head>
<body>
{% cms_toolbar%}
{% render_block “js”%}
</ body>
</ html>
But now after returning to the page, it is still the same as before, because we need to change the file crawling path. Change the original href = '...' and src = '...' as follows, {% static "css / bootstrap.css"%}, is a tag provided by Django, the purpose is to import the files we just copied. "Css / bootstrap.css" is the path, and the image file uses the same method. (ex: src = "{% static 'image / ab.png'%}")
At this time, when we go back to the browser and reload the page, we can see the beautiful page now!
1. Basic installation
pip install aldryn-newsblog
2. Django settings
(1). Add the following to the INSTALLED_APPS in settings.py, there are some apps may be already added, you don’t need to add it repeatedly
# you will probably need to add:
  'aldryn_apphooks_config',
  'aldryn_boilerplates',
  'aldryn_categories',
  'aldryn_common',
  'aldryn_newsblog',
  'aldryn_people',
  'aldryn_reversion',
  'djangocms_text_ckeditor',
  'parler',
  'sortedm2m',
  'taggit',

# and you will probably find the following already listed:
  'easy_thumbnails',
  'filer',
  'reversion',
(2) .THUMBNAIL_PROCESSORS
 THUMBNAIL_PROCESSORS = (
     'easy_thumbnails.processors.colorspace',
     'easy_thumbnails.processors.autocrop',
     # 'easy_thumbnails.processors.scale_and_crop', # disable this one
     'filer.thumbnail_processors.scale_and_crop_with_subject_location',
     'easy_thumbnails.processors.filters',
)
(3) .ALDRYN_BOILERPLATE_NAME
ALDRYN_BOILERPLATE_NAME = 'bootstrap3'
(4) .STATICFIKLES_FINDERS
STATICFILES_FINDERS is not in settings.py, just copy and paste
 STATICFILES_FINDERS = [
     'django.contrib.staticfiles.finders.FileSystemFinder',
     'aldryn_boilerplates.staticfile_finders.AppDirectoriesFinder',
     'django.contrib.staticfiles.finders.AppDirectoriesFinder',
]
3. Migrate the database
python manage.py migrate
4. Apphook
(1). Find an appropriate html template, add the area where you want to display the article to {% block content%} {% endblock content%}, this block will display the article list after Apphook
(2). Use the modified template, open the server to create a page that uses this template, and then enter the advanced settings of the page, select the html just used, and then select "News & Blog" for "Application".
(3). If there are articles in the database, a list of articles will appear in the place where we just writed {% block content%}.
In addition, this Blog Plugin supports a website to have more than one blog, create a new page and then Apphook again, so you can go to "Application Settings" to select or add new settings to be used as different blogs.
After apphook entire blog function comes in, you will find that the default style is too monotonous, so we need to change the template of style. The following describes how to quickly change the style.
1. Since there can be more than one blog, different blog pages can also have different styles. First go to "Application Settings" and add a desired name (assuming it is named blog), and then change the value of "PREFIX FOR TEMPLATE DIRS" (the default is blank) to the previous name (such as blog).
2. Because the template points to the changed relationship, Django can't find the template to render, so the website will break, so you must first create the Plugin template group on the specified path. Create an aldryn_newsblog folder under the templates folder, and then create a folder with the same name as the value set in "PREFIX FOR TEMPLATE DIRS" (such as blog), and copy all the templates preset in the package.
(The template of the kit preset can be found in [virtual environment location] /lib/python3.7/site-packages/aldryn_newsblog/templates/aldryn_newsblog/preset html)
3. In this way, as long as you edit the html file in this folder, the style on the web page will change (Note: "PREFIX FOR TEMPLATE DIRS" set by Blog is "blog" will change). Next, first change the style of the blog list page, edit article_list.html to change to what you want.
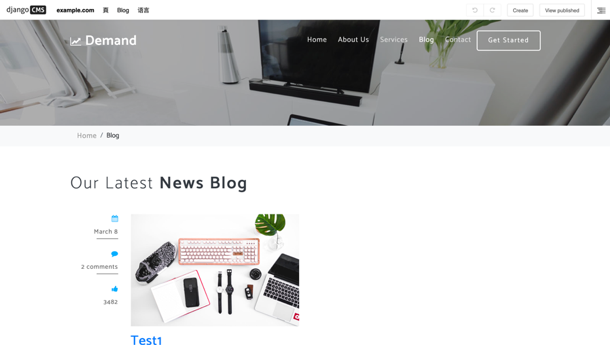
Now, you can follow your favorite style! As shown below!


Click here to download a PDF copy of this article
Save it to read later, or share with a colleague


Comment
There is no comment, you can make the first one!