
部落格

客製化地圖 CMS Plugin
建置網站時,常常會有重複的需求,像是下圖中可以提供地點的資訊同時展示地圖的功能可能在多個頁面或是多個網站都會用到。
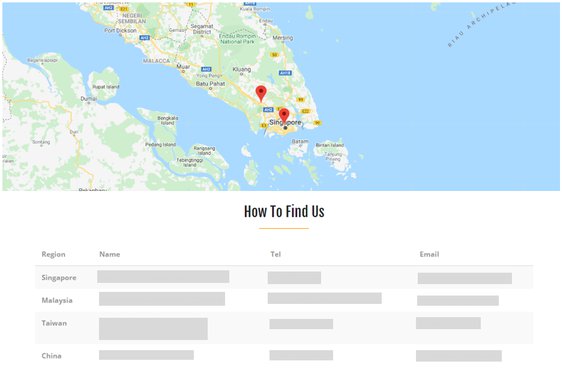
但是每個網站都需要重複編輯 map 的區塊、地點資訊的 table、以及控制動態互動的 js ,將 table 中的地點在 map 中標示出來;以及點擊表格中的特定地點,地圖動態聚焦在該地點上等功能。
這時候重複的部分就應該抽成 plugin ,方便網站的管理。
客製化cms plugin 輕鬆完成跨網頁的重複需求
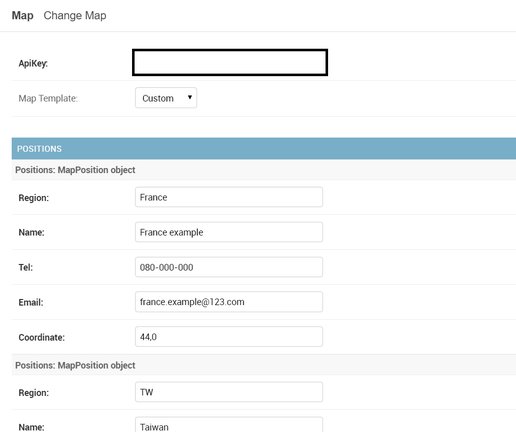
我們可以先設想完成 plugin 後,就可以在目標的 placeholder 加入 plugin,而編輯 plugin 時需要提供 GMap API key、一或多個地點個欄位的資訊、以及 render 這些內容的 html,就可以出現地點的表格以及依照表格上的地點標示的 map。
確定需求後,我們可以設定 plugin 的 input 就是 gmap api key、render 的 template、多個地點的資訊。
製作一個 cms 的 plugin 可以先參考官方的範例。我們可以理解在範例中 cms_plugins.py 中,以 HelloPlugin 繼承 CMSPluginBase,並且用 decorator 註冊這個 Plugin;而 model 則是填入在 models.py 已經建立好的 class,就可以在 Placeholder 中安插 Hello 的物件;而這個物件在網頁顯示的形式,就依照 render_template 的內容 render 出這個 plugin 的 html。
有初步的概念後,就可以打開你的專案開始動手了,如果沒有現有的網站也可以迅速建立一個。
在此以一個空白的 cms 專案做範例,建立 cms plugin,也就是將這個功能抽成一個 app ,這裡命名為 gmap_table 並加到 INSTALLED_APPS 中
從我們的需求可以建立兩個 Model: GmapTable GmapPosition。 GmapTable 就是為了記錄每個地圖的 API Key 以及選用的 template
GmapPosition 則是記錄與 GmapTable 關聯的地點(例如網站中想要展示多個地點在地圖上,就會形成多個地點關聯一個地圖的狀況,也就是多對一的關聯)
from django.db import models

from django.utils.translation import ugettext_lazy as _

from cms.models import CMSPlugin

# This might need to be adjusted to fit in any project
from gmap_table import settings

# Create your models here.

class GmapTable(CMSPlugin):
    apiKey = models.CharField(max_length=100)
    renderTemplate = models.CharField(
        _('GMap Table Template'), max_length=150, blank=True,
        choices=settings.GMAP_TABLE_TEMPLATES,
        default=settings.GMAP_TABLE_DEFAULT_TEMPLATE,
    )

    class Meta:
        verbose_name = _("GMap Table")
        verbose_name_plural = _("GMap Table")

class GmapPostion(models.Model):
    gmap = models.ForeignKey(GmapTable, related_name="positions")
    region = models.CharField(max_length=60)
    name = models.CharField(max_length=200)
    tel = models.CharField(max_length=60)
    email = models.CharField(max_length=60)
    coordinate = models.CharField(max_length=100)

    class Meta:
        verbose_name_plural = _('Positions')
        verbose_name = _('Positions')
這裡大家應該會發現凡是 template 的部分我都使用從 gmap_table import 的 settings,所以我們再來看在 __init__.py 我做了哪些有關 template 的設定。
from django.conf import settings as _settings
from django.utils.translation import ugettext_lazy as _

class Settings(object):

    GMAP_TABLE_DEFAULT_TEMPLATE = \
        "gamp_table/Default.html"

    GMAP_TABLE_TEMPLATES = [
        (GMAP_TABLE_DEFAULT_TEMPLATE, _("Default")),
    ]

    if hasattr(_settings, 'GMAP_TABLE_TEMPLATES'):
        for ele in _settings.GMAP_TABLE_TEMPLATES:
            if not ele[0] == "gmap_table/Default.html":
                GMAP_TABLE_TEMPLATES.append(ele)

settings = Settings()
GMAP_TABLE_DEFAULT_TEMPLATE 是提供最基本的預設 template,那如何提供其他的 template 選擇呢?
我們可以把客製化的各種 template 加在專案中,為了讓那些新增的客製化 html 檔案可以被視為 GMAP_TABLE_TEMPLATES 的選項,所以 import 這個專案的 settings,如果專案有設定 GMAP_TABLE_TEMPLATES 這個變數,那就要把所設定的 html 檔案加到 GMAP_TABLE_TEMPLATES 的 list 中,之後 plugin 的 template 選項就是以這個 list 作為依據
特別抽成一個 gmap_table 的 settings 控制 templates list,可以讓不同的專案,只要在專案的 Settings.py 設定 GMAP_TABLE_TEMPLATES 的客製化 html 就可以加到 plugin 的 template 選項了,不需要到 app 層級的設定檔設定。在 settings.py 的變數設置範例:
GMAP_TABLE_TEMPLATES = [
    ('CustomMap.html', 'Custom'),
 ]
接下來在 gmap_table 的資料夾下新增 cms_plugins.py 的檔案。
import requests
import json
import re

from cms.plugin_base import CMSPluginBase
from cms.plugin_pool import plugin_pool
from django.contrib import admin
from django.utils.translation import ugettext as _
from django.conf import settings
from django.utils.safestring import mark_safe
from django.template.loader import select_template

from gmap_table import settings as gmapTableSettings
from gmap_table.models import GmapTable, GmapPostion
from boto.ec2 import instance

class Spot(object):
    def __init__(self, region, name, tel, email, coordinate):
        self.region = region
        self.name = name
        self.tel = tel
        self.email = email
        self.coordinate = coordinate

class PositionInline(admin.StackedInline):
    model = GmapPostion
    # form = FormFieldInlineForm
    extra = 1

    def get_positions(self, request, obj=None):
        fields = (
            ('region', 'name', 'tel', 'email', 'coordinate')
        )

        fieldsets = (
            (None, {
                'fields': fields
            }),
        )
        return fieldsets


class GmapTablePlugin(CMSPluginBase):
    model = GmapTable
    module = _("GMap Table")
    name = _("GMap Table")
    inlines = (PositionInline, )
    render_template = gmapTableSettings.GMAP_TABLE_DEFAULT_TEMPLATE

    def get_render_template(self, context, instance, placeholder):
        return select_template([
            instance.renderTemplate,
            gmapTableSettings.GMAP_TABLE_DEFAULT_TEMPLATE,
        ])

    def render(self, context, instance, placeholder):

        spotList = []
        for position in instance.positions.all():
            spot = Spot(
                position.region,
                position.name,
                position.tel,
                position.email,
                position.coordinate,
            )

            spotList.append(spot)
        context.update({
            'spotList': spotList,
            'apiKey': instance.apiKey,
            'gmapId': instance.pk
        })

        return context


plugin_pool.register_plugin(GmapTablePlugin)
註冊 GmapTablePlugin ,因為在一個 plugin 可能有多個 position ,所以另外建立 PositionInline 才可以內嵌在 GmapTablePlugin 中。
另外在 GmapTablePlugin render 的過程中,更新 context ,才可在 html 中 render 出使用者編輯的資訊。
接下來就要設定 render 資訊的 html,在 templates/gmap_table/ 底下加 Default.html 檔案,並在檔案中填入:
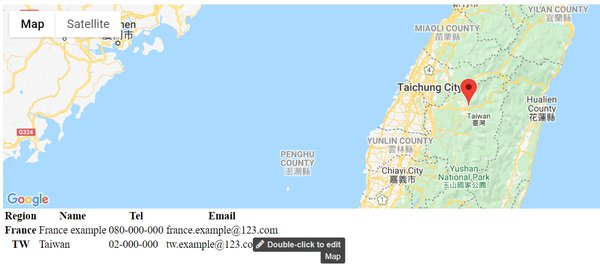
<script src="https://ajax.googleapis.com/ajax/libs/jquery/3.1.1/jquery.min.js"></script>

<div style="width:100%; height:50%;" align="center">
    <div id="GMap"></div>
</div>
<div id="mapPositions">
    <table class="table table-striped">
        <thead>
            <tr>
                <th scope="col">Region</th>
                <th scope="col">Name</th>
                <th scope="col">Tel</th>
                <th scope="col">Email</th>
                <th class="positionTitle" scope="col">Coordinate</th>
            </tr>
        </thead>
        <tbody>
            {% for spot in spotList %}
            <tr class="spot">
                <th scope="row">{{ spot.region }}</th>
                <td>{{ spot.name }}</td>
                <td>{{ spot.tel }}</td>
                <td>{{ spot.email }}</td>
                <td class="position">{{ spot.coordinate }}</td>
            </tr>
            {% endfor %}
        </tbody>
    </table>
</div>
<style>
    #GMap {
        height: 100%;
    }
</style>
<script>
    $(".position").hide();
    $(".positionTitle").hide();

    var map;

    function initMap() {
      var position = $(".position:first").text().split(",");
      map = new google.maps.Map(document.getElementById("GMap"), {

        center: {lat: parseFloat(position[0]), lng: parseFloat(position[1])}, // 25.031966, 121.563408
        zoom: 8
      });

      $(".position").each(function(){
         var position = $(this).text().split(",");
         if (position.length == 2){ //有 x 與 y
            var x = parseFloat(position[0].trim());
            var y = parseFloat(position[1].trim());

            addMarker(x, y);


         };
      });
    };
    $(".spot").each(function(){
        $(this).on("click", function(){
            var location = $(this).find(".position").text().split(",");
            var position = {lat: parseFloat(location[0]), lng: parseFloat(location[1])}
            map.setCenter(position);
        })
    });
    function addMarker(x, y) {
      marker = new google.maps.Marker({
        position: {
          lat: x,
          lng: y
        },
        map: map
      });
    }

</script>
<script src="https://maps.googleapis.com/maps/api/js?key={{ apiKey }}&callback=initMap&language=en" async defer></script>
接下來執行:
python manage.py makemigrations
python manage.py migrate
python manage.py runserver
就可以到你的網站看看了~
完整的程式碼範例專案在 這裡.
點擊立即下載此篇文章 PDF
稍後下載閱讀,或與好友分享
留言
pazapz@mailbox.in.ua
z1xsea
pazapz@mailbox.in.ua
rxz655
pazapz@mailbox.in.ua
s4yynl
pazapz@mailbox.in.ua
2uuo97
pazapz@mailbox.in.ua
0s7pm0
pazapz@mailbox.in.ua
soye94
pazapz@mailbox.in.ua
odhdq3
pazapz@mailbox.in.ua
g20pky
pazapz@mailbox.in.ua
ro736q
pazapz@mailbox.in.ua
ro736q
pazapz@mailbox.in.ua
k4byzf
pazapz@mailbox.in.ua
k4byzf
pazapz@mailbox.in.ua
hk9hjm
pazapz@mailbox.in.ua
hk9hjm
pazapz@mailbox.in.ua
rl7fh4
pazapz@mailbox.in.ua
rl7fh4