

Blog
DjangoCMS - how to integrate CMS into project
Django CMS(Content Management System) Introduction
Django CMS(Content Management System) Introduction Why do we use Django CMS?
It’s easy for user (who even know little about Django) to update website content by the website interface. Before start… Let’s imagine that we’re going to establish a school grading system.
In common, we might set grade as one model, so that I can store the grade instance in my database, and that I can create, update, and delete the grade instance if necessary.
Assume that we also provide some basic information about the school, like telephone number, address, etc.
After we finish the project and present it to the school, the school is satisfied. However, we get the call of the school just three years later. They require us to change the telephone number to the updated one. So we need to break the service, find the html file in which we write the telephone number, and restart the server.
Are these complicated repeated steps the only way to solve this trivial problem?
Of course not!
With DjangoCMS we can edit the content directly via the browser. Remember the concept, in which we regard grade as an object and store it in the database to accept flexibility.
CMS is kind of technology that transfer the content which is static in file into the object easy to edit. In the situation above, we should make some certain content, which might need to be updated in the future, the CMS plugin in advance, such telephone, address.
After the brief introduction of what the use of CMS is, let’s learn by doing
In this section Our goal is to integrate CMS and an original project
Rather than setting a new CMS website, we need to add some settings and install the module required Run the code below:
pip install django-cms
and in the Settings.py:
INSTALLED_APPS=[
	……
    'django.contrib.sites',
    'cms',
    'menus',
    'treebeard',
	'sekizai',
	'sekizai.context_processors.sekizai'

]
SITE_ID = 1
LANGUAGES = [
    ('en', 'English'),
	# this can be customized
]
And in the INSTALLED_APPS, insert
'djangocms_admin_style'
before
django.contrib.admin
Add the row in TEMPLATES
TEMPLATES = [
	{
		...
		'OPTIONS': {
			'context_processors':[
				...
				'sekizai.context_processors.sekizai',
			],
		},
	},
]
Run :
python manage.py makemigrations
python manage.py migrate
add these below in the MIDDLEWARE_CLASSES:
'cms.middleware.utils.locale.localeMiddleware'
'cms.middleware.utils.ApphookReloadMiddleware'
'cms.middleware.user.CurrentUserMiddleware',
'cms.middleware.page.CurrentPageMiddleware',
'cms.middleware.toolbar.ToolbarMiddleware',
'cms.middleware.language.LanguageCookieMiddleware',
In the context_processors of the OPTIONS in the TEMPLATES, add:
'cms.context_processors.cms_settings'
Then run :
python manage.py cms check
To check whether cms is installed successfully
After the steps mentioned above, the overall installation is complete The below is some necessary module to assist the CMS function
First You can assign the url to the CMS page Ex: for every url which is “cms/…”, we can take advantage of CMS
urlpatterns = [
	url(r'^accounts/', include('accounts.url')), # accounts management, unnecessary
	url(r'^admin/', admin.site.urls), # common admin management, might same as yours

	url(r'^cms/', include('cms.urls')), # This line exactly assign the url to CMS
] + static(settings.MEDIA_URL, document_root=settings.MEDIA_ROOT)

urlpatterns += staticfiles_patterns()
Second, we need to supply the template for CMS Add the below in the Settings.py:
CMS_TEMPLATES = [
    ('home.html', 'Home page template'),
]
For every CMS page, we can apply the template named “Home page template”
And we need to create the home html In the templates folder, add the file, home.html. The content is shown below
{% load cms_tags sekizai_tags %}
{% load static from staticfiles %}
<html>
    <head>
{% render_block "css" %} </head> <body> {% cms_toolbar %} {% placeholder "content" %} {% render_block "js" %} </body> </html>
Third, CMS not only make the text changeable, but also the image, and even other plugins( google map…). Therefore, we need to specify where to manage the image data In Settins.py, add:
MEDIA_URL = "/media/"
MEDIA_ROOT = os.path.join(BASE_DIR, "media")
In urls.py:
from django.conf import settings
from django.conf.urls.static import static

urlpatterns = [
	...
] + static(settings.MEDIA_URL, document_root=settings.MEDIA_ROOT)
Forth
We still need some module to complete the function
Run:
pip install django-filer djangocms-text-ckeditor djangocms-link djangocms-file djangocms-picture djangocms-video djangocms-googlemap djangocms-snippet djangocms-style djangocms-column
Add these in INSTALLED_APPS:
'filer',
'easy_thumbnails',
'mptt',
'djangocms_text_ckeditor',
'djangocms_link',
'djangocms_file',
'djangocms_picture',
'djangocms_video',
'djangocms_googlemap',
'djangocms_snippet',
'djangocms_style',
'djangocms_column',
Add into the Settings.py:
THUMBNAIL_HIGH_RESOLUTION = True
THUMBNAIL_PROCESSORS = (
    'easy_thumbnails.processors.colorspace',
    'easy_thumbnails.processors.autocrop',
    'filer.thumbnail_processors.scale_and_crop_with_subject_location',
    'easy_thumbnails.processors.filters'
)
Run:
python manage.py makemigrations
python manage.py migrate
Finally, we finish the installation! We can make our CMS page right away.
Let’s go to /cms We will see the blank page
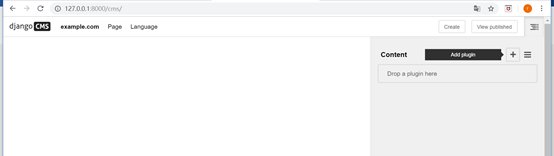
Just take a look at the navbar above and the side list They are quite useful! In the side list, click on the plus icon and add a plugin by yourself You can choose whatever type of plugin you like Then, you’ll see the page will update itself by your edition simultaneously
But, there’s a problem The page doesn’t seem like others The page is lack of the CSS and some arrangement of each plugin So, we need to adjust the template, Home page template
Choose your desired template which can present the information in same theme within the project. The next step is to add some tag to make CMS function work
at the beginning of the file, load the required tags
{% load cms_tags sekizai_tags %}
Before the close tag</head>:
{% render_block "css" %}
After the openingtag <body>:
{% cms_toolbar %}
Before the close tag </body> :
{% render_block "js" %}
And for the content that you might want to change in the future Replace the actual value of the content with the tag,
{% placeholder ‘yourPluginName’ %}
The pluginName will show in the side list, so that you can easily edit the placehoder
Take telephone as example transfer
<h3>phone: 0911223344</h3>
Into
{% placeholder ‘cellphone’ %}
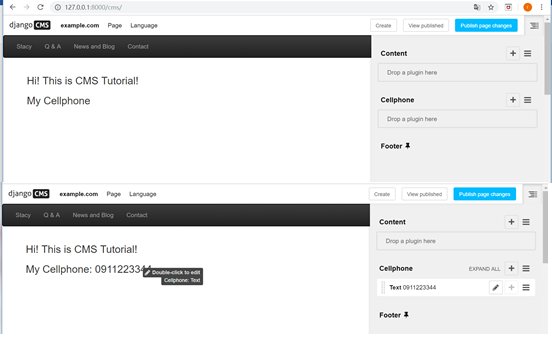
And jump to the page, and add the actual value in the plugin Believe you all can make your project upgrade with CMS!
Get the example project
Click here to download a PDF copy of this article
Save it to read later, or share with a colleague
Comment
There is no comment, you can make the first one!